
How to Straighten a Panoramic Photo in PTGui Pro
Panoramic photography allows photographers to capture wide landscapes, city skylines, architecture, interiors, and immersive 360-degree scenes with stunning detail. However, one of the most common problems photographers face after stitching panorama images is a crooked horizon, distorted perspective, or tilted composition. A panorama may look visually impressive, but even a slight tilt can reduce its professional quality.
This is where PTGui Pro becomes one of the best panorama editing tools available. PTGui Pro offers advanced panorama stitching and alignment features that help photographers create perfectly straight panoramic images with professional accuracy.
In this guide, you will learn how to straighten a panoramic photo in PTGui Pro step by step, along with useful tips, common mistakes to avoid, and expert techniques to improve your panoramic photography workflow.
What Is PTGui Pro?
PTGui Pro is a professional panorama stitching software used by photographers, real estate editors, virtual tour creators, drone photographers, and 360 panorama specialists. The software helps combine multiple overlapping images into a seamless panoramic photo.
PTGui Pro includes advanced features such as:
- Automatic panorama stitching
- Horizon correction
- Vertical alignment
- Perspective correction
- HDR panorama creation
- 360-degree panorama support
- Masking and blending tools
- Batch panorama processing
Because of its precision and flexibility, PTGui Pro is widely used in professional panorama editing workflows.
Why Straightening Panorama Photos Is Important
A panoramic image with a tilted horizon or distorted perspective can look unnatural and unprofessional. Straightening your panorama helps:
- Create a balanced composition
- Improve viewer experience
- Correct camera tilt issues
- Maintain architectural accuracy
- Enhance landscape realism
- Produce professional-quality results
Whether you are editing landscape panoramas, drone panoramas, or virtual tour images, proper alignment is essential.
Common Problems in Panorama Photos
Before learning the straightening process, it is important to understand common panorama issues:
1. Crooked Horizon
The horizon line appears tilted or uneven.
2. Vertical Distortion
Buildings or objects appear slanted or leaning.
3. Curved Horizon
Wide panoramas may create a curved or warped horizon.
4. Uneven Alignment
Some images may not align perfectly during stitching.
5. Perspective Errors
Objects may appear stretched or distorted.
Fortunately, PTGui Pro provides powerful tools to fix all these issues.
Step-by-Step Guide: How to Straighten a Panoramic Photo in PTGui Pro
Step 1: Import Your Images
Open PTGui Pro and load all overlapping images used for the panorama.
- Click “Load Images”
- Select your panorama photos
- Wait for PTGui to analyze the images
The software will automatically detect matching control points.
Step 2: Align the Images
Click the “Align Images” button.
PTGui Pro automatically stitches the images and creates an initial panorama preview. At this stage, the panorama may still look tilted or distorted.
Step 3: Open the Panorama Editor
After alignment:
- Click “Panorama Editor”
- A preview window will open
- You can now adjust the panorama orientation manually
This editor is the main workspace for straightening your panorama.
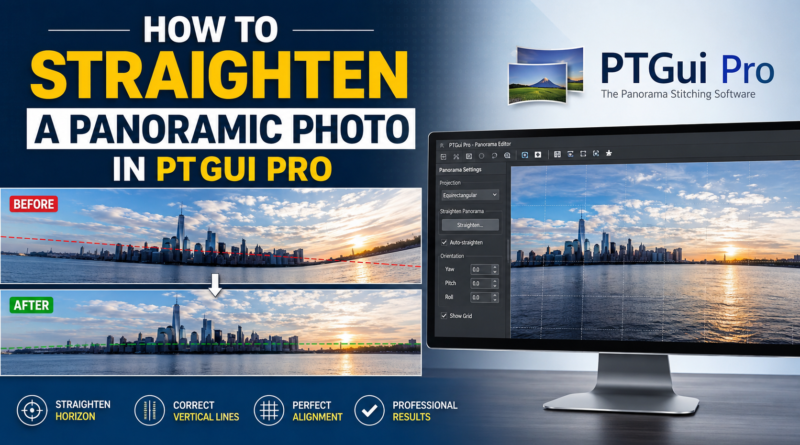
Step 4: Straighten the Horizon
Inside the Panorama Editor:
- Use the “Straighten” button
- PTGui automatically attempts to level the horizon
- Check whether the panorama looks balanced
In many cases, the automatic straighten feature works very well.
Step 5: Adjust Pitch, Roll, and Yaw
For better precision, manually adjust:
Pitch
Controls upward or downward tilt.
Roll
Corrects side tilt and crooked horizons.
Yaw
Adjusts left and right rotation.
Small adjustments can dramatically improve panorama alignment.
Step 6: Correct Vertical Lines
If buildings or objects appear tilted:
- Use the “Vertical Correction” tool
- Add vertical guide lines
- Align walls, poles, or buildings vertically
This is especially useful for architectural panoramas and interior photography.
Step 7: Choose the Best Projection Mode
Projection type affects how your panorama appears.
PTGui Pro offers several projections:
Rectilinear
Best for smaller panoramas and architecture.
Cylindrical
Ideal for wide landscape panoramas.
Equirectangular
Used for 360-degree panoramas and virtual tours.
Stereographic
Creates creative panoramic effects.
Experiment with different projections to achieve the most natural appearance.
Step 8: Crop the Panorama
After straightening:
- Remove empty edges
- Crop unwanted areas
- Improve overall composition
Cropping helps create a clean professional result.
Step 9: Optimize and Export
Once satisfied:
- Click “Create Panorama”
- Select image format
- Export high-resolution panorama
Popular export formats include:
- JPEG
- TIFF
- PNG
- PSD
Best Tips for Straight Panorama Photography
Use a Tripod
A tripod reduces camera tilt and alignment problems.
Shoot with Overlap
Maintain 25–40% overlap between images.
Keep the Horizon Level
Use your camera’s level indicator whenever possible.
Avoid Extreme Lens Distortion
Ultra-wide lenses can increase panorama distortion.
Use Consistent Exposure
Manual exposure settings create smoother blending.
Advanced PTGui Pro Features
PTGui Pro includes advanced tools that improve panorama quality even further.
HDR Panorama Stitching
Combine bracketed exposures into high dynamic range panoramas.
Viewpoint Correction
Correct stitching errors caused by moving objects.
Masking Tools
Remove unwanted elements from panorama scenes.
Batch Processing
Process multiple panoramas automatically.
Control Point Editing
Manually improve stitching accuracy.
Common Mistakes to Avoid
Over-Rotating the Panorama
Excessive adjustments can distort the image.
Ignoring Vertical Lines
Buildings should appear straight and natural.
Using Wrong Projection
Different scenes require different projections.
Poor Image Overlap
Insufficient overlap creates stitching errors.
Cropping Too Aggressively
Avoid losing important composition elements.
PTGui Pro vs Other Panorama Software
PTGui Pro is often preferred over other panorama tools because of its advanced control and professional workflow.
PTGui Pro Advantages
- Faster processing
- Better manual control
- Excellent 360 panorama support
- High-quality stitching engine
- Professional correction tools
Many professional photographers consider PTGui Pro one of the best panorama editing solutions available today.
Professional Panorama Editing Services
Sometimes panorama projects require advanced manual correction, especially for real estate, drone photography, virtual tours, and commercial projects. Professional panorama editing services can save time while delivering high-quality results.
For expert panorama stitching and editing services, visit:
https://www.photoeditingservicesco.com/360-panorama-photo-stitching-services
Their team provides professional panorama stitching, alignment correction, and 360-degree panorama editing services for photographers and businesses.
Final Thoughts
Straightening a panoramic photo is one of the most important steps in creating professional-quality panorama images. Even a small horizon tilt or perspective distortion can affect the final result.
PTGui Pro offers powerful tools that make panorama correction easier and more precise. By learning how to adjust horizon lines, correct perspective, choose the right projection, and optimize alignment, you can dramatically improve your panoramic photography.
Whether you are editing landscapes, architecture, interiors, drone panoramas, or virtual tours, mastering PTGui Pro will help you create clean, balanced, and visually stunning panorama images.
With practice and the right workflow, you can produce professional panoramas that stand out and impress viewers.